3/21/12

Ideas for jewelry organizing....


My jewelry box is not quite this disorganized, but it is slowly getting there. I have been pondering the idea for quite some time on how to organize my jewelry. I have a beautiful jewelry box but it is just not large enough for all my necklaces to hang in. In addition, there is not place for earrings except for everything to lay in a little drawer, all jumbled together. Every time I want a particular pair of earrings, I have to go through every drawer to find the ones I want, which usually involves dumping each drawer on the bed to look through it. Then having to pick it up again.

I had purchased this several years ago at a local Family Dollar store for $10 and never really used it.


It hangs on the wall and opens up to this.


I also have this drawer that is a junk drawer (unlike the jewelry mess above, I claim this mess as totally mine) and the items in it need to be put somewhere else so I can free this drawer up for use. I don't think I have cleaned out this drawer in 10 years because I just never use it for anything. It is a long drawer that isn't very deep.


This morning, I had an inspiration. First, I will hang the little jewelry box up on the wall. Even though there are only a few hooks for necklaces, I am fine with that. I can hang more than one per hook. Then I'm going to clean out the drawer and get a few little trays like this....


I can get square ones for bangle bracelets and watches. Then the long one can be for my bracelets that clasp so they can lay flat.

That just leaves the dilemma of the earrings. I pondered and pondered what to do about earrings so I don't have to dig for the right pair every time I go somewhere. Inspiration struck in several forms.

Ice trays...


Or mini muffin pans


Or even Wilton candy molds
I think I am very excited about these ideas. I'll keep you posted on how it turns out.

3/20/12

Easter Craft Projects


I love the fact that I can find things that are simple to do for my Pinterest Challenges. It makes me feel more productive when I can actually take my pins and create something that makes me happy. I actually have two challenges to share with you today.

Challenge # 1

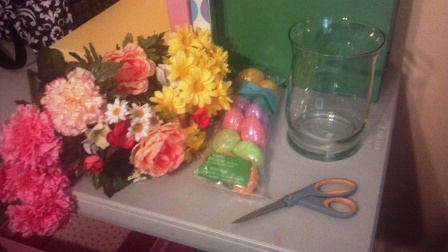
The first is my Easter Egg Floral arrangement. I ran to Walmart and purchased a vase, some eggs and some flowers. The flowers were for a couple of other projects as well, but just counting the ones used for my challenge along with the eggs and vase, I have about $7 or $8 in the project.

I laid out what I had purchased along with my scissors and wire cutters.


I opened the eggs and placed them in the vase.


I then placed cut the flowers I wanted to use and placed them inside the vase.


Do you remember my pink bunny for $4.50 from my last antique run? Well, I placed it and a chicken salt dip I already had beside the vase on the kitchen table.


And this is now my Easter centerpiece on the kitchen table. I may need to get some more eggs to add since the vase was a little big than I thought it would be. But I still love the way it turned out.

Challenge # 2

The second challenge was an adorable Easter Egg wreath I had seen on Pinterest. It was probably the easiest craft I have ever made. Walmart supplies include two dozen plastic eggs, green floral wire and a roll of ribbon of your choice. Total cost was $5.97 before taxes. Armed with my supplies and my trusty wire cutters, I set to work.


Make sure you get the eggs with the holes. I just unrolled a foot or two of wire, but don't cut it yet. that way the eggs will slide down and stop at the wire package, preventing them from sliding off the other end.  Plus you can unroll more if you need to. Open up your egg and run the wire through the bottom right hole...


And through the top left hole...


Snap it closed and let it slide down your wire.


When you get done, clip the wire and tie two or three knots real tight to pull the eggs together in a circle. (sorry I forgot to take a pic of this step) Cut some ribbon in whatever length is easy for you to work with when tying. You can trim off excess later. I cut mine at 7" and didn't need to trim it any once it was tied. 


Figure where you want your ribbon based on how many ties you want. I did four and placed them every third egg, starting from where I tied the circle. Place your ribbon underneath the two eggs you want it between.


Simply tie the ribbon in a knot between the eggs. No need to double knot. If you want little bows, you could do that as well, but I want just the tie.


Once you have completed that (I did 4 ties), cut a longer piece of ribbon to make a bow for the top. I was going to get wire ribbon and make a fancy bow, but decided in this case simple was better. Tie your bow between the two eggs where you joined the wire.


Make a look out of the wire that is tied together.


When you hang it up, because the wire is flexible, it will automatically shape in an oval, egg like shape. If you want a perfect round circle, you would need to use a stronger wire. This was the look I saw on Pinterest. I could not be any happier with the results. It is just adorable, affordable and so cute. Not bad for a 15 minute craft project.


I was in a decorating mood so I pulled out the Easter Egg apron Mom made me last year.


I also unpacked the Easter Egg tea for one. I put some yellow flowers in my new little milk glass vase and put them on my rack.


I hung the apron on the shelf to add to the Easter mood in the kitchen.


I had some leftover pink flowers that I inserted into my daisy planter. Some leftover eggs went into a little candy dish with a piece of the pink ribbon tied around it. I put this on my file cabinet to make my office more springy.


And what started all this energy to do some crafty for Easter? My niece Amy. I showed you her vase centerpiece recently. Now she has a new table runner with Easter eggs all over it. Isn't it adorable.


3/19/12

Never heard of them before....

I had never heard of glass butter pats. Have you? On a recent antique run, I noticed a cute little dish about 3" - 4" in diameter. I looked on the tag and it was a called a "butter pat".  According to my research Antique Web states the following:

No table was properly set during the Victorian era without small butter dishes. The Victorians loved excess–in the decoration of their homes and clothing accessories–and no where is this more exemplified than in the place settings of the 19th century dining table. During the age of elegance each category of food required a separate piece of china or silver. Formal Victorian tables were set with a serving of bread, consumed without butter, hidden in the folds of each guest’s linen serviette. If a course required buttering, the servants placed individual miniature plates, approximately three inches in diameter, above and slightly to the left of center of the service plates.

 The one I saw was so similar to this one and only cost $3.00.


I should have snatched it up but had no idea what a butter pat was, even though the name made sense. Apparently for a proper place setting we should have a butter pat and a salt dip for each place setting. I decided to research my favorite on-line haunts (Ebay, Etsy, Listia, Google, and Craigs List) to see if I could find any other photos of butter pats. Wow! I sure did. There are a ton of them out there. It may be fun to collect some of them. Here were some of my favorites. There are some that are square and I thought this one was cute.


This would be a cute set to use for Easter dinner.


This was very elegant looking.


These white ones would go good with my blue and white holiday china.

 
My daughter-in-law collects Blue Willow. I will have to check and see if she has any butter pats and keep my eyes open for some.
 
 
This is a Limoges set, which is what my antique three piece butter dish is. Just a different pattern.
 
Butter Pats. Set of 4. Theodore Haviland. Limoges. Mark q.
 
I thought these were really cute because you rarely see brown trim on dishes. They would be great for Thanksgiving dinners.
 
White & Brown Butter Pats
 
I don't know what this one is, but I really liked it.
 
Antique Teal Green Transferware   Butter Pat Salt Dip Togo Lake Rowboat Flowers
 
I would be interested in knowing if any of you have ever heard of butter pats before and if you collect any.

3/18/12

Have a cup of faith....


You start your morning every day with a cup of coffee, a glass of juice, something to get you jump-started to face the day.


What if you got up every morning and drunk a nice warm cup of faith.


What if it filled you up from head to do with the warmth of God's love.


What if that morning dash of faith replaced your caffiene and carried you on a natural high throughout the entire day.


What if you spent the morning with God in His Word instead of the negativity that is the morning news.


What if you actually took the time to talk with God over a cup of faith every morning.


What if you actually went through your whole day recalling how good that morning cup was and wanted to keep going back for a refill.


What if God showed up at your door every morning with a fresh cup of faith to get you through the day.


Just stop and think about it. Think about spending your morning cup with the Lord. It does make you wonder.....What if?

3/17/12

That sweet baby boy....

....is now a teenager.


I have a teenage grandson. Unbelievable. Thirteen years ago today, my son and his wife gave me my very first grandchild. I wish I had the words to convey how it felt to hold that tiny little baby in my arms the very first time. I thought my heart was going to burst with the love that filled it up.


You love your children and they mean the world to you and that never changes. But a grandchild! Be still my heart. There isn't anything in the world that compares to seeing little bits of your own child show up in your grandchild.


Christian Garret. My first grandchild. I can't believe it has been 13 years.  13 years of birthday parties.


Thirteen years of smiles.


Thirteen years of fun.


Thirteen years of sparkle.


Thirteen years of mischief.


Thirteen years of laughter.


Thirteen years of love.


Happy birthday, Garret. We love you.